I’ve been lucky enough to work with the best hockey players on the planet in my time working in the National Hockey League. Now, it’s my mission to help deliver the same type of training that helped those players stay fast and strong to anyone and everyone that is willing to put in the work. I recently launched an online training option so that I can reach and impact hockey players around the globe and you can actually sign up below.
“Bantam Back” is a description of a lumbar stress fracture in youth hockey players. For those unfamiliar, Bantam refers to hockey players ages 13-15 years old. Basically, it is Spondyloylsis which is a stress fracture in the pars interarticularis of the lumbar vertebrae which is a small bone joining 2 vertebrae. These fractures can happen from repetitive stress.
Unfortunately, this condition has been popping up frequently in recent years. I first heard of this condition from John Bottoms, a Minneapolis based Physical Therapist. The frequency of how many kids are in his clinic for this shocked me. What can strength and conditioning coaches do during the reconditioning process and what can they do to help prevent them from happening in the first place?
https://orthoinfo.aaos.org/en/diseases–conditions/spondylolysis-and-spondylolisthesis/
From my personal observation, the typical Bantam Back individual is a longer/taller player. They also may have recently had a growth spurt. I imagine it could happen with shorter players but from what I have seen, they’ve been on the taller side. They also play hockey on a year-round basis.
Although I do think that repetitive rotation in shooting is a contributing factor, I also believe that improper skating technique contributes. Specifically, when skating mechanics break down (“bag” skating or punishment skating after practices). This is where players can become more straight-legged versus maintaining a proper back position and knee bend. I also believe that there is an inability for coaches and players to determine the proper depth and technique for skaters. I think we can get confused when teaching taller players to get low while skating. For example, a taller player may not look low in comparison to smaller players. However, when you take hip and knee angles into consideration, they may be closer than you think. I believe that the stress in the back is higher for taller players who maybe coached to get lower. When you add in repetitive and useless conditioning drills- the outcome isn’t good.
The prescription when diagnosed with Bantam Back is 3 months of no activity. However, physical therapy can begin during that time. This is crucial so that the fracture can heal while also removing any activities that may have helped caused the injury in the first place. In the recovery process, the no activity prescription is strict. Some orthopedic specialists may recommend a back brace during the 3 months.
What can happen is that people don’t listen to the doctor’s advice. Maybe the player is diagnosed during the competitive season? Maybe a showcase that is heavily scouted is coming up? It doesn’t matter. The 3 months off is key. I understand that this isn’t good news but I look at it as a time to reset and refocus on some things before returning to the ice. The payoff is bigger in the long run.
The treatment plan at the beginning consists of low level core exercises and stretches specifically for the hamstrings and hip flexors. The progression gradually becomes challenging from low level to more functional applications so that the player can return to the ice. Usually, the rehabilitation combined with the 3 months of rest results in a positive outcome.
What can Strength and Conditioning Coaches do to help these situations and what can they do to help prevent from them happening?
Although I don’t think it is appropriate, year-round hockey is normal nowadays. Players have more opportunities to play outside of the winter hockey season. It is important to participate in other sports and/or recreational activities. I think that the time off the ice and away from hockey is important. When I think about the professional players that I get to work with, they take a minimum of 1 month off of the ice when the season ends. When they do return to the ice, the intensity and duration is progressed over the next few months up until training camp. Bantam aged players are not professionals. Their bodies are still maturing. I think the 3-month activity is a blessing for those who suffer from bantam back.
When it comes to exercises and progressions, I think it’s important to note that I am not a Physical Therapist (PT). I do help with the reconditioning of athletes. I also use exercises that PT’s will use with injured athletes with the healthy athletes that I work with. I truly believe that if a PT prescribes exercises with an injured client, why wouldn’t I want to prescribe exercises with a healthy athlete to help prevent injuries? Whether it is core exercises, pre-habilitation, or functional training- I really don’t care. As long as what we are doing is working and we are simultaneously getting faster, powerful, and stronger.
Where I think the Strength and Conditioning Coach is important is in the return to play phase and then helping the player with preventing this from happening again. When it comes to program design, I think that some modifications need to be made. Avoiding exercises that could promote hyperextension of the lower back while under load could help as well as avoiding axial loading. For example, back squats, front squats, overhead pressing, deadlifting, and Olympic lifting would be discontinued. I do think that there are many ways for an athlete to get more powerful, stronger, and faster without risking further injury.
The Mcgill Torso Muscular Endurance Test Battery (1) is used as an assessment to measure endurance in the trunk flexors, lateral endurance (side bridge), and the back extensors. This can be used as a baseline measurement at the beginning of rehab. During the course of the 3 months, this can be reassessed to see progress.
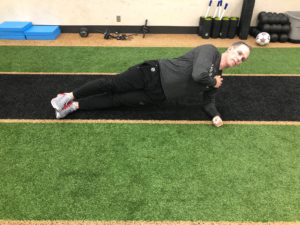
When it comes to core training, I do think improving performance of the Mcgill Torso Muscular Endurance Test Battery helps. McGill’s Big 3 (2) is a really good safe and simple way to increase not only performance in the Endurance test, but also a way to build a strong and stable back with endurance capabilities. We’ve removed what others refer to as traditional core training and have since been incorporating the Trunk Curl Up, the Side Bridge, and the Bird Dog as well as Glute Bridges for our floor-based exercises.
TRUNK CURL UP
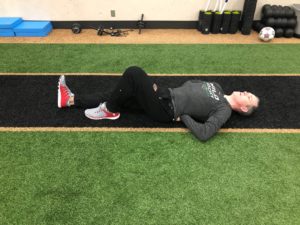
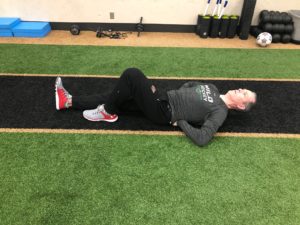
SIDE BRIDGE
BIRD DOG
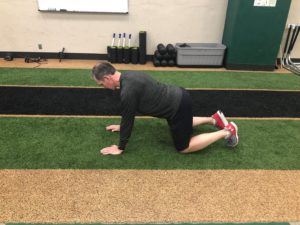
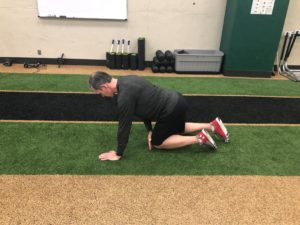
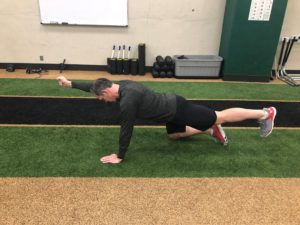
What about Skating? As I mentioned before, I believe that less than adequate skating technique can contribute to Bantam Back. I think that after the 3-month long break, the player needs to be with a good skating coach to help the player possibly re-learn skating technique. The fundamental position of skating needs to be emphasized so that lower back health isn’t compromised. This combined with proper strength and conditioning off the ice can contribute to the player returning back to their normal level of play. I have personally seen kids come back to skate and play again at a higher level.
Again, sometimes an injury like this can be a blessing in disguise. It may sound crazy, but it is 3 months forced rest. Unfortunately, some kids need that today. A young athlete competing year round combined with less attention to technique can be as a recipe for something like this.
- https://www.acefitness.org/cmes-resources/pdfs/02-10-CMES-McGillsTorsoEnduracneTest.pdf
- https://www.livestrong.com/article/392341-stuart-mcgills-big-three-back-exercises/
I like to read books all the time- although I probably don’t read as much as others. Here are some of the books that I have read recently and have almost finished:
Tough to say that this is a book that I am reading but I did purchase it and do read the words on the page on a daily basis. I enjoy starting my day with gratitude writing. I have tried a few of them but I wanted to try a new process. So far so good.
Iron Works Preparation: The Best Way to Prepare for Football
I have really enjoyed listening to Arizona Cardinals Strength and Conditioning Coach Buddy Morris on several different podcasts. I have also read some of his “Coach X” material on Elitefts.com. This book (which is co-authored by Ryan Williams)was another way to see how good strength and conditioning coaches organizes their thoughts and write programs. I am a nerd when it comes to this stuff and enjoy learning how other coaches write programs even if it isn’t for hockey.
Gift of Injury
This is a great resource for me because I have low back pain. I am also always looking for methods that work in the prevention of LBP in my athletes/clients. I have read lots of Stuart McGill’s work but this was different because it was written from Dr. Mcgill’s perspective as well as the athlete’- Brian Carroll. I had the opportunity to meet with Brian at the the annual PHATS meeting in Orlando. It was pretty neat to hear his experience.
Thinking, Fast and Slow
I had a good start with this and I put it down because I found it to be a tough read. I anticipate picking it up again soon.
Would love to hear thoughts and suggestions.
 I recently had the privilege of attending Charlie Weingroff’s seminar at Momentum Sports Physical Therapy in Lake Forest, CA. For those that don’t know Charlie, he is a really bright person, physical therapist, and strength coach. I actually first met him at the Perform Better Summit in Rhode Island in 2010, even though I have read most of his information prior.
What I really like about Charlie is that he has some very similar philosophies as me in regards to how he trains athletes. He is also does unbelievable job of blending strength and conditioning principles with his physical therapy knowledge. So, when he is giving a seminar 15 minutes away from my house, I am in.
For me, writing these kind of posts allow me to go back and look at my notes from seminars and then organize them better by putting them out there. At the same time, these are my notes and may come across as random.
-“Get it Right versus doing the best you can.” Charlie was very passionate about this thought. He doesn’t like hearing that people “Did the best you could”. Find out the best right way how to do something and do it. Doing the best you can isn’t acceptable.
-The Making a Monster concept wasn’t what I thought it was going to be. I actually thought he was going to give us exercises, sets, and reps of how to make a monster. I was wrong. There is actually so much more to do before you prescribe sets and reps. It goes back to the first thought- Get it right. Dial in the athlete’s movement, preparation, and sensory systems before we assign sets and reps (which is probably the easy part).
-Charlie touched upon aerobic energy system work. Aerobic energy system work can help the locomotor system. Charlie recommends aerobic work to be done in the 30-60 minute range at a heart rate below 110 bpm. Especially for those who may be in pain or in a rehabilitation setting.
-“More Keys you have on the key ring, the more doors you can open”. I loved this quote. To me, there is nothing wrong with learning as much information that you can and then filtering the information and then developing and building your own system. For whatever reason, people in our industry criticize others for learning lots of new information and applying it. I somewhat agree and also somewhat disagree. I think that it is important that you are also being smart about how you incorporate new information. We need to be good at what we do. For example, I am a strength and conditioning coach. I want to be the best strength and conditioning coach for my athletes. Sometimes, we find those that learn new information in the form of a seminar or a book and try to apply it right away without having a foundation from what the knowledge is built upon. I am not a physical therapist, but I find that I can learn apply information learned from PT’s in my setting. However, I can’t and won’t treat pain, manipulate people (physically), or “practice” PT. Be good at what you do and what you are.
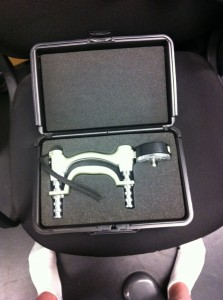
– I really like what the omega wave technology does and could do for myself and my athletes. The reality is that it costs 35k. So, I won’t be purchasing one anytime soon. However, Charlie talked about using grip strength as a way to assess stress levels. From reading more information from guys like Patrick Ward and Charlie, finding a way to assess my athletes stress levels and then either ramping up or backing off on them MAY be something that I would consider doing. We will see as I need to experiment with it. However, I just found a hand grip dynamometer in the Athletic Training room. Since it has a sticker on it that says it needs to be calibrated in 1999, it hasn’t been used in a long time.
-Are we using our lumbar extensors when we should be using our hip extensors in exercises such as glute bridges? For me personally, I needed to see and feel this. As a coach who has been using glute bridges with my athletes for a few years now, maybe I need to re-look at this again. Why? Well, I need to work on my own hip extension pattern as I really don’t have much hip extension ability in my hips. However, Charlie was able to help me and give me a few correctives that I think work better than glute bridges in terms of re-learning how to use my glutes and hamstrings versus my lumbar extensors. Maybe my athletes are using their lumbar extensors as well?I think hockey players could always use some more hip extension pattern length.
-Rolling patterns should be assessed and corrected if they are impaired. This is something that I could see and feel directly.
All in all, this seminar was really good. I actually had to miss the afternoon of the 1st day as my son Will had a playoff hockey game. I would recommend that you see Charlie at one of his seminars or at the Peform Better Summits this summit. Charlie will also be speaking at the Okanagan Strength and Conditioning Conference this summer.
The ball squeeze is an exercise that is used for adductor strain post-rehabbed hockey players and as a prevention tool.
At the beginning of every season, we will do a Functional Movement Screen (F.M.S.) with each member of our team. It has become a part of the whole overall testing and assessment process. The process of using the F.M.S. has evolved as I have learned new strategies and techniques from season to season to help us incorporate corrective exercises into our program. During the first few seasons that we implemented the F.M.S., we simply screened our team and then implemented our in-season program. Now, we are taking a much more individualized corrective exercise approach as I felt that we needed to incorporate some corrective exercises to help the players with F.M.S. issues and prevent players from having problems.
We have seen some trends in the scoring the F.M.S. over the past 5 years. The hurdle step pattern has been one that has shown some asymmetries. Mike Boyle has written and talked about this pattern and his hockey players for a few years now. We have definitely benefited and implemented some of his ideas and progressions.
Another part of the F.M.S. where we will see some asymmetries is the Shoulder Mobility Screen. Every season, we will have some shoulder mobility asymmetries with some of our players. Many times, these players may be new players acquired by our team through trades or through free agency. With these players, it is not uncommon to hear them describe having a previous injury which may have been a separated shoulder, an AC sprain, or a dislocation/partial dislocation earlier in their career. They may have undergone surgery to correct one of the previously mentioned injuries or they may have rehabbed it without surgery. Either way, the injury has caused them to lose some mobility and/or stability in the shoulder joint and in the thoracic spine. Therefore, we may have some differences in right versus left side in our shoulder mobility screen.
The Thoracic Spine is an area that we are continuing to learn more about. Many hockey players display some thoracic kyphosis and will also show signs of Janda’s Upper Crossed Syndrome. Tight pectoralis major and pectoralis minors, combined with weak upper back muscles are common. There are many factors that may of lead to these imbalances such as prolonged sitting, improper training programs, or simply playing the game of hockey. Along with previous injuries, these imbalances are another reason why we may see some asymmetries in the shoulder mobility screen.
Something that I have learned from listening to and reading Gray Cook’s materials is that one of the biggest predictors for injury is previous injury. The most important aspect of our jobs as strength and conditioning coaches is injury prevention and recovery about which you can learn more here on the products and tools we use to do it. It is important to try to ensure that a previous injury will not become a current injury. Making corrections in faulty patterns by correcting tightness and/or weakness is beneficial to preventing further injuries.
With the shoulder mobility assessment and its corrective strategies, I’ve realized that making progress will not happen overnight. These are not exercises that can be done once or twice and then forgotten about. We have found that using the corrective strategies that have worked for us usually have to be done on a daily basis.
How do we incorporate the corrective exercises? With a long schedule consisting of many practices and games, players will develop their own routines to help them prepare on a daily basis. We will simply have the players who have exhibited asymmetries on the Shoulder Mobility screen add some of the corrective exercises into their daily pre-practice and/or pre-game routines. As a result, we have seen small increases in shoulder mobility as we go along. It is not uncommon to hear our players say that their shoulders feel better.
Here is a sequence of exercises that we do with our players. Each part of the sequence needs to be done in order and no parts can be missed. The proper order needs to be followed to allow us the greatest chance of success.
Soft Tissue Work- We will use many different methods to address thoracic spine mobility including the foam roller, the Stick, and 2 tennis balls taped together. We will address the posterior shoulder girdle, the upper back, the pectorals, and the lateral aspect of the rib cage. Sue Falsone, Physical Therapist from Athlete’s Performance, gave an outstanding presentation at last summer’s Perform Better Functional Training Summit that covered the Thoracic spine. She discussed several methods of increasing mobility in the t-spine. We have successfully borrowed and implemented some of her ideas from her talk.
One thing I remember learning from a Gary Gray course that I took 7 years ago was that he said “Use the other 2 planes of to help get more motion in the less mobile plane.” In the case of the thoracic spine, increasing mobility in the sagittal and frontal planes will help with gaining mobility in the transverse plane, while increasing mobility in the transverse and frontal planes will help with gaining mobility in the saggital plane. We will look to increase mobility in all 3 planes of motion using the easiest and most efficient methods. We will also work on flexibility for muscles that can become shortened and tight including the Pectorals Major and Minor, latisimus dorsi, and subscapularis.
Here are some of the exercises and progressions that we have used to help us gain more mobility and stability in the thoracic spine and glenohumeral joint:
Standing T-Spine Rotation- This exercise is borrowed from Michol Dalcourt. I really like this one because we are standing.
Quadruped T-Spine Rotation- This is another exercise that we have used to help prevent the lumbar spine from moving so that the rotation is primarily at the t-spine level.
Standing Wall Slides- This is the easier progression of the wall slide. The back of the head, shoulder blades, and butt are touching the wall. We are simply keeping them against the wall as we slide our arms up the wall until our hands and elbows can no longer stay in contact. A much more difficult version of this exercise is also standing, but in addition to the head, shoulder blades, and butt, we try to keep the lower back flat as well.
Seated Wall Slides- this is a more difficult version of the standing wall slide as we are now in a position where the lower back is flat against the wall which will allow for a more kyphotic thoracic spine to take place. This will put the athlete in a position where the anterior muscles need more length and the scapula retractors more strength to get the shoulder blades to touch the wall.
Integration-
One of the aspects of the F.M.S. that I like is that asymmetries in one of the screens can result in an issue in another screen. For example, with an athlete with shoulder mobility 1’s and 2’s, it is common to see a 1 or a 2 in the Deep Squat assessment. We will try to correct the Deep Squat after we have seen some positive results from our Shoulder Mobility exercises. Sometimes by just working on shoulder mobility, we have seen positive changes in the deep squat. If we still have some issues with thoracic spine extension, we will incorporate this:
Toe Touch Squat With Alternating Arm Reach-
With hockey being a collision sport, injuries to the shoulder joint are not 100% avoidable. However, if we can make positive changes by helping our players feel better, I am all for it.
This is my favorite time of the year as the days are getting longer and it is getting warmer outside. Personally, my family and I are preparing for our new addition this May. We are really looking forward to it as parents and brother. Professionally, the team is making what seems like to be an annual playoff push. Every game is important as we try to climb the standings for a chance at making the playoffs.
What I also like about this time of year is that all of the information on all of the strength and conditioning, physical therapy, fitness, and coaching seminar information is being published. There are many to choose from all across the country. For myself, I am going to be going to at least 2 as an attendant and 1 as a speaker. Maybe I will see you at one of them?
As a speaker, I will be at the Roger Neilson Coaches Clinic. This is will be held June 10th through June 12th in Windsor, Ontario. I am truly honored and humbled to be speaking at this event. If you look at the list of the past speakers who have spoken at it, you can see why. My topic is on In-Season Strength and Conditioning for Hockey. With the fact that I am with our players for a good 8-10 months out of the calendar year, this phase of training is very important for injury prevention and performance enhancement.
As an attendee, I will be attending Kevin Wilk’s Recent Advances in the Treatment of the Shoulder and the Knee July 15th through July 17th in San Diego. This is a seminar that I really wanted to get to last summer. Now, it looks like the dates and the location of the course line up perfectly. I really think we can learn from smart physical therapists. Shoulders and Knees are definitely areas that we want to reduce the chances of injury with our players.
The Perform Better Functional Training Summit returns to Long Beach August 26th through 28th. This is one seminar that I really haven’t missed in a long time. With the number of quality presenters to choose from, this is a can’t-miss. I am really looking forward to seeing people such as Dan John, Gray Cook, Mike Boyle, Todd Wright, and Vern Gambetta speak.
Along with going to seminars, it is important to go and visit other coaches who are doing things better than you in some areas. With the NHL scouting combine being June 3rd and 4th in Toronto, I will try to visit with some people in the Toronto area who will be in off-season training mode with the players that they train.
Neck Strengthening For Hockey
Since hockey is a fast game with frequent changes of direction and collisions, injuries to the head and accompanying neck strains will sometimes unfortunately happen. When I mention head injuries, I am referring to a hit to the head by an opposing player or when a players’ head may hit the ice or the glass as a result of a hit from an opposing player. I know that this may be referred to as a concussion. However, with the uncertainty of what a concussion may or may not be, I will leave the definition and diagnosis to the doctors and medical professionals. Concussion or not, an injury to the head and/or neck is a serious matter.
Recently there have been a high number of pro players who are out of the lineup or have yet to play his season because of post head injury related symptoms. There is currently a head injury epidemic in hockey and also in football. As a result, rules are being implemented and equipment is being modified to help combat the problem.
In my own experience with seeing these episodes, it was usually a player who was in a vulnerable position when contact was made by an opposing player. When the player was hit, it might have been a shoulder or an elbow to the head. In all of the cases, I don’t believe that there was anything that could have been done to prevent them from happening.
Each situation that I have seen varied in its severity and recovery time. Some players came back to the lineup quicker than others while others may have taken longer. I have also unfortunately had to see a player have to retire from the game because his symptoms weren’t improving. Each case and the recovery process ran its course differently with each individual.
The most difficult time for the athlete who is recovering from these injuries is the time that it takes to become symptom free. Symptoms may include dizziness, sensitivity to light, nausea, headaches, depression, and/or an overall bad feeling. These can last for weeks and/or months at a time. During this recovery time, the athlete cannot participate in anything that increases heart rate or perceived exertion. It is a “wait and see” time. Team doctors and athletic training staffs have strict protocols in place that may clear or not clean an individual for activity while in the recovery process.
One of the most difficult situations as a Strength and Conditioning Coach is working with a player who gets cleared to resume training again after an episode like this occurs. The player wants to hit the ground running (or the ice skating) and get back in the lineup as soon as possible. It is important for the athlete and the strength and conditioning coach to be patient during this process. The longer that the player has been out of the lineup, the more patient you have to be as it may take longer.
From a physical standpoint, one of the first things to happen while the athlete is inactive in the recovery process is the loss of lean body mass. Adding lean body mass onto an athlete (especially one who has had the weight on before) can be done easily with a sound strength training program and adherence to proper nutrition. Where it is more difficult is when they may be cleared to resume activity during the competitive season. It can be very hard to add lean body mass to a player while in-season. The volume of skating in practices combined with the strength and conditioning work can be a difficult obstacle to overcome.
The whiplash associated with a head injury will almost certainly cause trauma to the neck muscles. There are several muscles that can be affected including the trapezius and several other supporting muscles that help support the weight of the head. To help with this, we will enlist our massage therapist to help those muscles relax and release the spasms. This is one of the most important aspects of the recovery process.
One thing that I have learned is that proper neck strength can help lessen the severity of the whiplash effect from any hit involving the head. Although we don’t have any neck machines in our training facility, I think we are doing neck injury prevention training almost on a daily basis. We will accomplish this through the Olympic lift variations that we do such as the hang clean, hang snatch, and dumbbell snatch. In my opinion, if we are Olympic lifting, we will help prevent the effects of a head injury by trying to limit the whiplash effect by getting our neck extensors and stabilizers stronger. If you ask any athlete a day or two after doing Olympic lifts to point out where they are sore, more than likely they will have some sore traps and upper back region.
What do we do with players who don’t Olympic lift? With these players, we will have them perform dumbbell shrugs, manual resisted isolated neck exercises and/or isometric neck bridges. (We will also perform these exercises in addition to Olympic lifting for some individuals.) Here are some videos of those exercises:
Manual Neck Extension– We will stick to doing manual neck extension only. We will not do any flexion or rotation. We are very cautious as we don’t want to provide too much resistance while the athlete is performing the movement. We will provide 10% of max resistance only and instruct the athlete to perform extension in a smooth, fluid like fashion.
Neck Bride on Stability Ball– This has to be done with a partner who is spotting. We will simply put a stability ball between a wall and the back of the players’ head. We will start with a 15 second hold and progress accordingly. We will not progress this to a wrestler type bridge on the floor or with the stability ball on the floor.
While I certainly can’t say that we can prevent head injuries in hockey, we certainly can help prepare our athletes with the ability to have a strong neck to help lessen the severity of the whiplash effect. Collisions on the ice or on the field (football) are similar to car accidents. As a strength and conditioning coach, it is our responsibility to help prevent injuries in the safest manner. Strengthening the neck is a priority for us.
The more I continue to read Gray Cook’s book, Movement: Functional Movement Systems: Screening, Assessment, Corrective Strategies, the more I realize how much more I need to learn. (A recent evening hanging out with Charlie Weingroff also led me to that conclusion). Right now, I am re-reading chapter 13. Specifically the section on Transitional Posture.
We have been using more half-kneel positions with some of our lifts. What I like about this position is that core stabilization is almost automatic because the athlete can’t compensate. Gray writes “It (half kneel) creates an interesting stabilization experience, because many individuals who have poor core stabilization can compensate at the foot, ankle, and knee. They can also compensate with poor hip, pelvic, spine, and shoulder positions, as well as faulty alignment. In half-kneeling, all compensations are removed”.
To me, this makes so much sense for athletes with spinal stability issues. Also, we are preventing spinal stability issues from happening in the first place by mastering stability and strength in this position. All that we have to do is have our athletes maintain a tall spine with good posture. We will spend a greater amount of time in this phase so we can have a smooth transition into lunge position lifts.
In this post, I want to show you how we will actually strengthen our glutes after we have ensured that they are turned on and ready to go. In our situation, when hockey players get into the routine of playing and/or practicing every day, the hip flexors can become short and tight. It is imperative that the glutes and hip extensors are doing their jobs as effectively as possible on the opposite side of the hips to help allow the hip flexors to relax.
After our activation phase in our workouts, we will utilize exercises in our workouts that strengthen the glutes in conjunction with other muscles to produce hip extension and hip external rotation.
We will use many different exercises and patterns within our strength program that will ensure the glutes are used. These are just some examples that we use all throughout the year:
Kettle Bell Slideboard Split Squat- This is a great exercise that is frequently used in-season. The glute on the front leg gets a lot of work on the ascent back up to the starting position.
Kettle Bell 1-Leg S.L.D.L.- This is an exercise that we use for single leg hip-hinging and hip extension patterns.
Slideboard Leg Curl- This is one of our favorite hip extension plus knee flexion pattern. This is a great way to strengthen the hamstrings while getting good glute contraction to keep the hips extended.
Bench Hip Lift- This is a new variation that we have been incorporating into our program for the last year or so. We have recently been experimenting with loading this movement more and more. Although we have done this as an “activation” exercise on the stability ball in the past, I have recently been re-introduced to this by Bret Contreras. We will continue to look for ways to progress in this exercise by adding load and/or going to single leg variations.

